 QDStar
Manual
QDStar for the Icom IC-705 · Windows and Linux
Inside QDStar, Help › User manual (F1) opens this page.
What QDStar is
QDStar controls an Icom IC-705 in D-STAR Terminal Mode from a Windows or Linux computer:
- It talks to the radio over WiFi with the Icom network protocol: the control and CI-V streams, without audio. It replaces wfview for D-STAR work.
- It has its own gateway for Terminal Mode over USB, so you do not need DStarRepeater, ircDDBGateway or any other service. It links reflectors over DPlus (REF), DCS (DCS, XLX) and DExtra (XRF).
- It shows who is on the air, with name, location, distance and bearing, and keeps a history of every over.
- It collects the D-PRS positions and weather reports that arrive with the voice, and manages your own D-PRS beacon.
Installation
Download the file for your system from the download section or the releases page.
Windows 10/11 (x64)
- Installer (
…-windows-x64-setup.exe): it installs QDStar for your user, with no administrator rights needed. If QDStar is already installed, the installer offers to update, reinstall or uninstall it. Updating keeps your settings, history and reflectors. - Portable (
…-portable.zip): unzip it anywhere and runqdstar.exe.
Windows SmartScreen may warn you the first time, because the program is not signed. Choose More info → Run anyway.
Linux (x86-64 and ARM64)
There are three formats. Pick one and stick to it: they are separate installations.
| Format | Best for | Updates |
|---|---|---|
| AppImage | Any distribution, no administrator rights | From QDStar itself |
| .deb | Debian, Ubuntu, Linux Mint, Raspberry Pi OS | Install the new .deb |
| tar.gz | Running it from a folder of your choice | Unpack the new version |
Not sure which architecture you have? Run uname -m: x86_64 is a PC (amd64 / x86_64 files), aarch64 is ARM64 such as a Raspberry Pi 4/5 with a 64-bit system (arm64 / aarch64 files).
AppImage
- Download
QDStar-x.y.z-x86_64.AppImage(or-aarch64on ARM64). - Make it executable:
chmod +x QDStar-*.AppImage, or tick Allow executing file as program in the file's properties. - Open it with a double click or from a terminal:
./QDStar-x.y.z-x86_64.AppImage. - QDStar asks Install QDStar for this user?. Choose Install: the AppImage is moved to
~/.local/bin/QDStar.AppImageand QDStar appears in the applications menu with its icon. No administrator rights are needed, and the downloaded file is gone from your downloads folder. - From then on, start QDStar from the applications menu.
When a new version is out, choose Update now in the notice (see Updates): QDStar downloads it, puts it in place of the installed one and restarts. If you chose Not now, Help › Install for this user… installs it later; Don't ask again leaves the AppImage where it is, and updates then replace that file.
To remove it, use Help › Uninstall QDStar…: it deletes the AppImage, the menu entry and the icon. Your settings, history and reflectors are kept.
If the AppImage does not start, your system may lack FUSE. Install it (sudo apt install fuse3 on Debian and Ubuntu), or run it with ./QDStar-*.AppImage --appimage-extract-and-run.
.deb
Install it with sudo apt install ./qdstar_x.y.z_amd64.deb (or _arm64.deb). apt pulls in the libraries it needs, and QDStar appears in the applications menu and as the qdstar command. To update, install the new .deb the same way; to remove it, sudo apt remove qdstar.
tar.gz
Unpack it wherever you like (tar xzf QDStar-x.y.z-linux-amd64.tar.gz) and run qdstar/qdstar. It adds nothing to the applications menu. To update, unpack the new version over the old folder.
USB access for EXT mode
For EXT mode your user needs access to the radio's USB serial ports: sudo usermod -aG dialout $USER on Debian, Ubuntu and Raspberry Pi OS, or the uucp group on Arch. Log out and back in afterwards.
The ARM64 builds run on Raspberry Pi OS bookworm, Debian 12 or later and Ubuntu 22.04 or later.
Radio setup
Network (both modes)
- Connect the IC-705 to your WiFi network (SET › WLAN Set) and give it a fixed IP address, or reserve one in your router.
- In WLAN Set › Remote Settings, set Network Control to ON and create a Network User with a user name and password.
INT mode: internal gateway over WiFi
- DV GW › Gateway Select: Internal Gateway (WLAN).
- DV GW › Internal Gateway › Gateway Repeater (Server/IP/Domain): your G3 Terminal Mode server, for example
server1.dstar.es. - Terminal/AP Call Sign: your call sign with
Zin the 8th position (EA7KLX Z). - Turn Terminal Mode on (MENU › DV Gateway › Terminal Mode).
EXT mode: QDStar's gateway over USB
- Connect the radio's USB cable to the computer.
- DV GW › Gateway Select: External Gateway USB (B).
- Terminal/AP Call Sign: your call sign with
Bin the 8th position (EA7KLX B). - Turn Terminal Mode on.
First run
The first time, QDStar opens the settings. Enter the radio's IP or host name, the network user and the password you created on the radio, and press Save. QDStar connects and reads your call sign from the radio (MY call sign). You do not need to type it.
QDStar also imports the connection details from wfview if they are there. Only one QDStar runs at a time: opening it again brings the running window to the front.
The main window
The window is narrow and tall so that it fits next to other programs. Its width is fixed, and you can make it taller to see more history.
Status LEDs
| LED | Meaning |
|---|---|
| Icom | Network session with the IC-705. It is green when connected and blinks amber while connecting. |
| CI-V | The radio answers CI-V commands. |
| Internet | Internet access (the XLX directory answers). |
| USB | EXT only: the radio's USB cable is connected to the computer. |
| Gateway | EXT only: the gateway answers. |
| Reflector | The selected reflector is online. |
| Linked | Linked to the reflector. |
| RX / TX | Receiving or transmitting voice. |
Hover over any LED to see what it means.
The reflector screen
The black screen shows, from top to bottom:
- The reflector: name, description, whether it is online, the number of connected nodes and the link state.
- The station on the air, or the last one heard. It shows the call sign, the name and location from radioid.net, and the over's message and duration. When the station sends a D-PRS position, a box shows the distance and bearing from you, with an arrow pointing towards the station (north up). When the last over is yours, the box shows a circle with a cross and MY.
- Last heard on the reflector: the latest stations, from the reflector's dashboard or from your history.
- The footer shows your call sign, your locator (when the radio knows your position), whether you send D-PRS, and the clock.
Mode, reflector and tabs
Below the screen are the INT · WiFi and EXT · USB/PC buttons, with a LED on the active one. A ⚠ sign appears when the radio does not match the chosen mode, for example when the radio is still in INT while you chose EXT. Hover over it to see what to check.
Next come the reflector list with its buttons, and the History, Log, D-PRS and Weather views.
The views: History, Log, D-PRS and Weather
By default the four views sit as tabs under the screen. Each one has a small title bar with two buttons:
- Detach (or a double click on the title bar) moves the view into its own window, which you can move and make as large as you like. The History, for instance, can be much wider than the main window. The same button, or a double click, attaches it back.
- Close (✕) hides the view. The View menu has a tick box for each view to show or hide it.
View › Reset layout brings the four views back as tabs. QDStar remembers the layout between sessions. With no view left in the main window, it shrinks to the screen and its bars, and it grows back when you attach one.
System tray icon
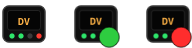
QDStar puts an icon in the system tray. It has a green dot while you receive and a red one while you transmit, and its tooltip shows the mode, the reflector and the station on the air. Click it to show or hide the window. Right-click it for the menu, with Show/Hide QDStar and Quit.
When a station comes on the air and the QDStar window is not in front, a notification shows its call sign, name and reflector. If you turn on Closing the window keeps QDStar running in the tray in the settings, the window's close button only hides it. Quit from the tray menu or from Radio › Quit.
INT and EXT modes
| INT · WiFi | EXT · USB/PC | |
|---|---|---|
| Gateway | The radio's own, through a G3 server | QDStar's, on your computer |
| Connection | WiFi only | WiFi for control, and USB for the voice data |
| Changing reflector | QDStar writes the TO (UR) over CI-V: choose it and press Change | Choose it and press Link. Unlink drops the link |
| Reflectors | The ones your G3 server offers | REF, DCS, XLX and XRF |
Change mode with the two buttons. Remember to change Gateway Select and the Terminal/AP Call Sign on the radio too (see Radio setup).
In EXT mode, QDStar remembers the reflector you were linked to and links it again the next time it starts.
Linking from the radio (EXT)
With the built-in gateway you can also link and unlink from the radio, as with ircDDBGateway. Put a command in the UR field (the TO of the DR screen) and key up for a second. That over does not go to any reflector: the gateway runs the command and answers with a text message on the radio's screen.
| UR | What it does | Answer on the radio |
|---|---|---|
XLX214DL or XLX214 D | Links reflector XLX214, module D. REF, DCS and XRF reflectors work the same way. | Linked to XLX214 D |
U | Unlinks. | Unlinked |
I | Tells you what the gateway is linked to. | Linked to … / Not linked |
E | Echo test: records your over and plays it back a second later (up to one minute). | Your own audio |
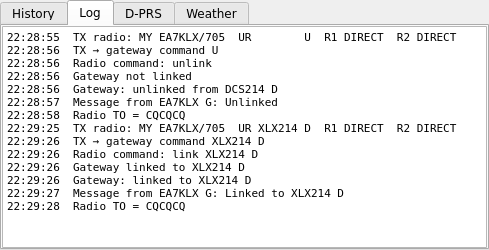
U and linking with XLX214 D, as the Log shows themThe radio's own menu writes these commands for you: TO › Reflector, then Link to Reflector, Unlink Reflector, Reflector Info or Echo Test. After a command, QDStar puts the UR back to CQCQCQ, so the next over goes to the reflector. It needs the radio connected over WiFi to do that. After an echo test the UR is left as it is, so you can repeat the test. Command overs are not added to the history.
Reflectors
The list joins your own reflectors and the ones from its sources, such as the selection built into QDStar. Manage it in Reflectors › Manage…:
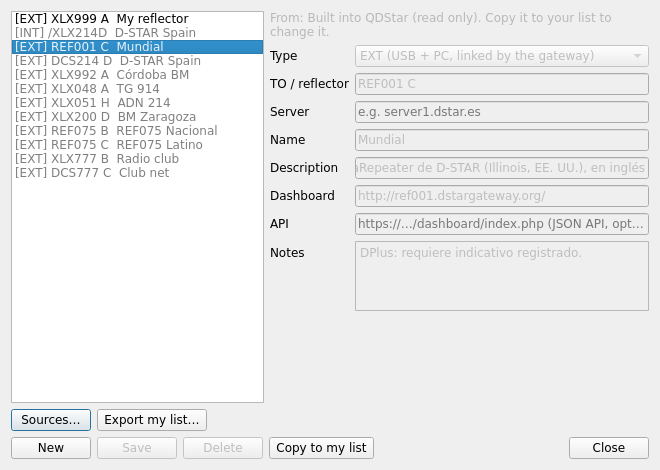
- Type: INT (the TO is written to the radio) or EXT (linked by QDStar's gateway).
- TO / reflector: in INT, the TO the radio sends (
/XLX214D). In EXT, the reflector and module (REF001 C,DCS214 D,XLX048 A,XRF988 D). - Server: INT only. It is the G3 server that leads to that TO. QDStar warns you when it does not match the one in the settings.
- Name and Description: the texts shown on the screen.
- Dashboard and API (optional): the reflector's web page and its xlxd JSON API, used for the node count and the last heard list.
The reflectors that come from a source are read only, and the form says where they come from. Copy to my list makes your own copy, which you can change and which wins over the source's. Fields you leave empty in your copy keep the source's values, so a renamed copy still has the dashboard and API that tell whether you are linked. Export my list… saves your own reflectors as a JSON file, to share them or to publish them as a source for others.
Reflectors › Refresh status asks every reflector for its state straight away.
Reflector sources
Sources… in the reflector manager lists where reflectors come from, besides your own list:
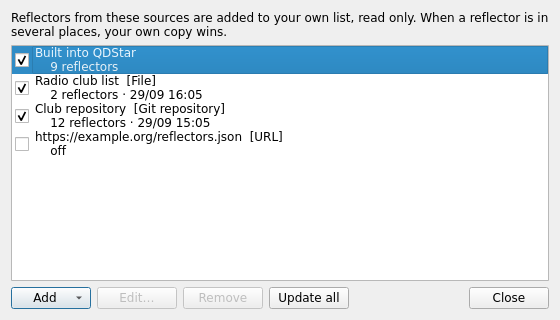
- Built into QDStar: the selection that comes with QDStar, updated with each new version.
- URL: a list published on a web server (
https://…/reflectors.json). - File: a list on your computer or on a shared folder.
- Git repository: a list in a repository on GitHub, GitLab, Gitea or your own server. You can give a branch and the path of the file inside the repository (
reflectors.jsonby default). For a private repository over HTTPS, fill in the user and a password or token. Over SSH (git@…) your own SSH keys are used. Git has to be installed (on Windows, Git for Windows). QDStar only reads the repository, it never writes to it.
Tick or untick a source to use it or not. The sources are fetched when QDStar starts and every 6 hours, or at once with Update all. Each one keeps its last good copy, so the list still works without a connection. When a reflector is in several places, your own copy wins.
Passwords and tokens are kept in the system keyring (KWallet or GNOME Keyring on Linux, the Credential Manager on Windows), never in the log. If there is no keyring, QDStar says so and keeps them in its settings file. Removing a source also forgets its password.
A list is a JSON file with one object per reflector, the same format that Export my list… saves:
[
  {"via": "ext", "to": "XLX214 D", "name": "D-STAR Spain",
   "description": "XLX214 module D", "dashboard": "https://…/dashboard/"},
  {"via": "int", "to": "/XLX214D", "server": "server1.dstar.es", "name": "D-STAR Spain"}
]
History and log
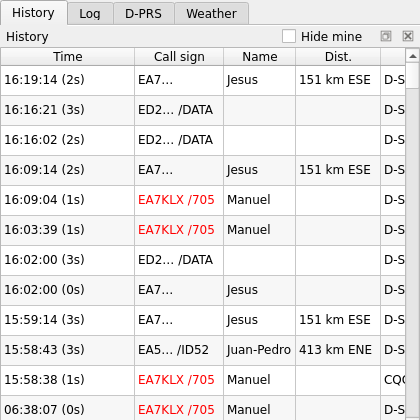
The History tab lists every over, received and transmitted. The columns are time (with the over's duration in brackets), call sign, name, distance, reflector, location and message. Your own overs have the call sign in red; Hide mine, in the view's title bar, hides them. A name or message that arrives after the over has ended is filled in on its row. History › Clear history… deletes it.
An over from the history on the screen
Click a row of the History and the screen shows that over in place of the live activity, in a violet frame labelled HISTORY. You see its date, duration, reflector, call sign, name, location, message, and the distance and bearing. The arrow keys move through the history, and the screen follows. The reflector block and the last heard list stay live.
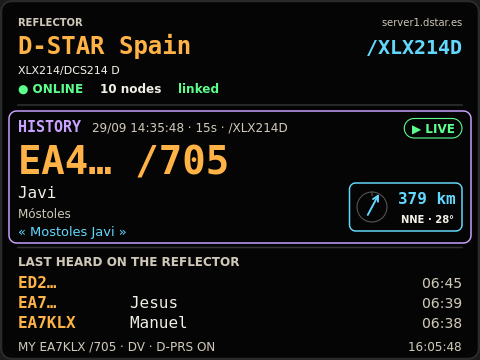
To go back to the real-time view, press ▶ LIVE (or click anywhere on the screen) or press Esc. It also goes back on its own as soon as a new over starts, received or transmitted, so you never miss one.
The Log tab shows what the application is doing: connections, links, errors. Radio › Log RX/TX CI-V frames adds the raw CI-V traffic, which is useful when reporting a problem.
D-PRS and weather
Received reports
Many stations send their position (D-PRS) with each over. QDStar reads it from the radio and shows the distance and bearing on the screen and in the history.
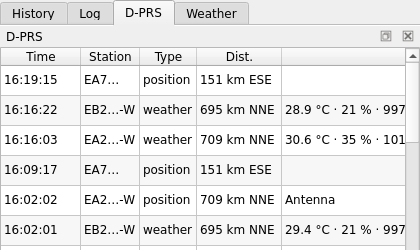
The D-PRS tab lists every report received: positions, objects, items and weather reports. That includes the ones relayed by other stations, such as the APRS gateways that repeat reports into D-STAR, and the Via column says which station carried each one.
The Weather tab shows a card for each weather station heard, with its temperature, humidity, pressure, rain and wind.
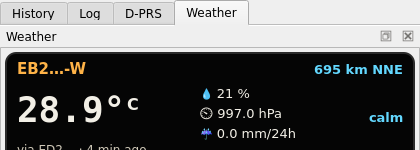
You can hide both tabs in the settings. The position of the station on the air is still shown either way.
Your own position
Radio › D-PRS position… reads and changes the radio's D-PRS settings over CI-V:
- Send my position with every over: turns the D-PRS beacon on or off (GPS TX Mode = D-PRS).
- Position source: the radio's internal GPS, or a manual position.
- Manual position: latitude and longitude in degrees (west negative), with an optional altitude. Use locator fills them in with the centre of a grid square, so you announce an area rather than your exact home.
- Symbol, SSID and Comment of your beacon.
QDStar uses your position, from the GPS or the manual one, to work out the distances. Nothing is written to the radio until you press Save.
Your position on APRS-IS (aprs.fi)
With Send my D-PRS position to APRS-IS turned on in the settings, QDStar also sends your position to the APRS-IS network after every over, so it shows on aprs.fi. It works in INT and EXT, and only while the radio sends its position (GPS TX Mode = D-PRS). It uses the position, symbol, SSID and comment of the radio's own beacon. An unchanged beacon is sent at most once every 5 minutes.
The APRS-IS passcode is worked out from your call sign, so there is nothing to type. Optionally, QDStar can also send the positions of the stations it hears. Positions that come from APRS (objects, weather stations, reports relayed by other stations) are never sent back.
Settings
Open them from Radio › Settings…. They are split into four tabs: Interface, Radio, INT / EXT and APRS-IS. The first time, with no radio set up yet, they open on the Radio tab. Changes apply when you press Save. If you change the language, QDStar uses it from the next start.
Interface
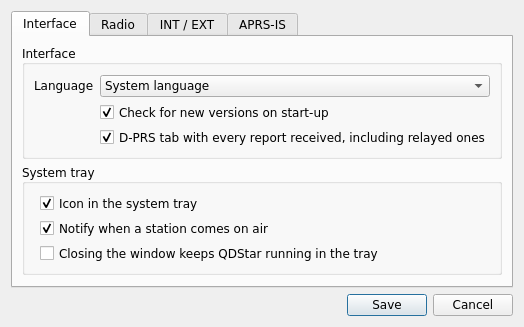
| Field | What it does |
|---|---|
| Language | The language of the interface. System language follows your computer, and falls back to English when the system language has no translation. |
| Check for new versions on start-up | On start-up, and once a day while QDStar is open, it asks GitHub whether there is a new version (see Updates). Nothing else is sent. |
| D-PRS tab with every report received | Shows the D-PRS and Weather views. Turn it off if you only care about the position of the station on the air, which the screen shows either way. |
| Icon in the system tray | Shows the tray icon. It is not available when the desktop has no system tray. |
| Notify when a station comes on air | A notification for each new station on the air, only while the QDStar window is not in front. |
| Closing the window keeps QDStar running in the tray | The close button hides the window instead of quitting. Quit from the tray menu or from Radio › Quit. |
Radio (WiFi)
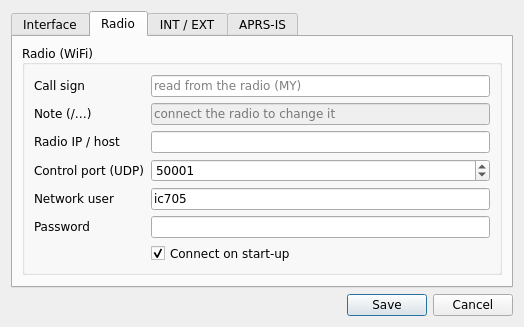
| Field | What it does |
|---|---|
| Call sign | Your call sign, without a suffix (EA7KLX). If you leave it empty, QDStar fills it in with the radio's MY call sign the first time it connects. The EXT gateway uses it to log in to reflectors, and to build the Terminal/AP call signs when those are left empty. |
| Note (/…) | The note of up to 4 characters that goes after your call sign on the air, for example 705 to be heard as EA7KLX /705. It is read from the radio and, when you change it, written to the radio's selected MY call sign memory, keeping the call sign itself. The log confirms the change. The field is only available with the radio connected; leave it empty to remove the note. |
| Radio IP / host | The radio's address on your network (SET › WLAN Set on the radio). A fixed address is best. |
| Control port (UDP) | The radio's Network Control port. It is 50001 unless you changed it in Remote Settings. The CI-V port is the next one (50002). |
| Network user / Password | The Network User created on the radio in Remote Settings. They are only used to log in to the radio. |
| Connect on start-up | Connects to the radio as soon as QDStar opens. Otherwise, connect from Radio › Connect. |
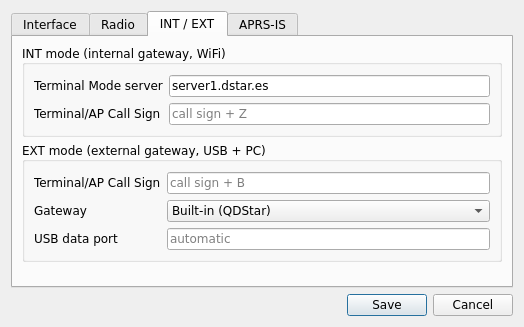
INT mode (internal gateway, WiFi)
| Field | What it does |
|---|---|
| Terminal Mode server | The same server as the radio's DV GW › Gateway Repeater (Server/IP/Domain), for example server1.dstar.es. The radio does not report it over CI-V, so you type it here. QDStar compares it with the server of each INT reflector and warns you when the chosen reflector needs a different one. |
| Terminal/AP Call Sign | The Terminal/AP call sign set on the radio for INT. Empty means call sign + Z (EA7KLX Z). QDStar uses it to tell whether the radio is really in INT (the ⚠ next to the mode buttons). |
EXT mode (external gateway, USB + PC)
| Field | What it does |
|---|---|
| Terminal/AP Call Sign | The Terminal/AP call sign set on the radio for EXT. Empty means call sign + B (EA7KLX B). The gateway only accepts the radio's traffic with this call sign. |
| Gateway | Built-in (QDStar) is the usual choice: QDStar itself talks to the radio over USB and links the reflectors. External ircDDBGateway is for those who already run DStarRepeater and ircDDBGateway (G4KLX) on the computer. QDStar then only drives them, and the extra fields below appear. |
| USB data port | The serial port the radio uses for Terminal Mode data (for example /dev/ttyACM1 or COM5). If you leave it empty, QDStar finds the IC-705's port by itself. Fill it in only if detection fails. |
These fields only appear with External ircDDBGateway:
| Field | What it does |
|---|---|
| ircDDBGateway host | The machine where ircDDBGateway runs (127.0.0.1 if it is this computer). |
| Remote control port / Remote password | ircDDBGateway's Remote settings, which QDStar uses to link and unlink reflectors. On Linux you can leave the password empty, and QDStar reads it from ~/.config/dstar/ircddbgateway. |
| Command when entering EXT | A command run when you switch to EXT, to start the G4KLX services (for example systemctl --user start dstar.target). |
| Command when leaving EXT | A command run when you leave EXT, to stop them. |
| Command when the USB is plugged in | A command run when the radio's USB appears. DStarRepeater cannot open a port that was missing when it started, so it has to be restarted (for example systemctl --user restart dstarrepeater). |
APRS-IS
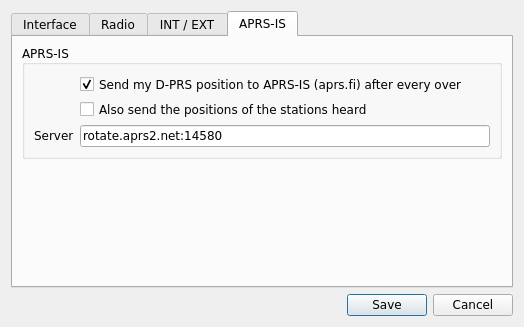
| Field | What it does |
|---|---|
| Send my D-PRS position to APRS-IS (aprs.fi) after every over | See Your position on APRS-IS. Off by default. |
| Also send the positions of the stations heard | Only the position of the station on the air, never relayed reports. The station's own gateway may already send it. Off by default. |
| Server | The APRS-IS server and port. The default, rotate.aprs2.net:14580, picks a server near you. |
Updates
QDStar checks GitHub for a new version on start-up and once a day. When one is out, a ⬆ New x.y.z link appears next to the mode buttons, pointing at the right file for your system. You can also check by hand in Help › Check for updates…, and turn the automatic check off in the settings.
With the Linux AppImage, Update now downloads the new version, checks it against the SHA-256 published on GitHub, puts it in place of the one you run and restarts QDStar. There is no file to replace by hand.
Troubleshooting
The Icom LED never turns green
- Check the IP, user and password, and that Network Control is ON on the radio.
- Only one program can hold the radio's network session. Close wfview, RS-BA1 or any other remote control software.
The radio refuses the connection after a crash
Close QDStar before switching the radio off, so it ends the network session cleanly. A session left open can keep the radio's network server busy until the radio is power cycled.
EXT mode: the USB LED is red
Check the cable, and on Linux check that your user is in the dialout (or uucp) group. If the data port is not found, choose it by hand in the settings.
A REF reflector does not link
DPlus needs your call sign registered in the D-STAR trust network. Try a DCS or XLX reflector to confirm everything else works.
EXT mode: the radio does not transmit
If the PTT does nothing and the log shows USB: the radio refuses the stream, the radio's Terminal Mode is stuck. Leave Terminal Mode on the radio and enter it again.
No notifications appear
Check that the desktop's Do Not Disturb mode is off. While it is on, the notifications only go to the desktop's notification history.
⚠ next to the mode buttons
The radio's Terminal Mode does not match the mode chosen in QDStar. Hover over it to see what to change on the radio.
Contributing
- More reflectors: open a pull request adding entries to
qdstar/default_reflectors.json. - New languages: copy
qdstar/translations/es.poto your language's code, translate it and open a pull request. The README explains how. - Bugs and ideas: open an issue on GitHub.
QDStar is free software (GPL-3.0-or-later). The Icom network protocol is reimplemented from wfview. The Terminal Mode, DPlus, DCS and DExtra code is ported from G4KLX's DStarRepeater and ircDDBGateway.